.png)
Doughn’t give up on us baby… I will show you how to make sourdough starter and bread from scratch!
- Lisa Williams
- Jun 1
- 12 min read

DISCLAIMER - I am neither a professionally trained baker nor a scientist. This article is based solely on my firsthand experiences and a little googling.
I am going to explain this to you as simply as I can. If you are like me and have avoided making sourdough because of the complicated, well, science of it all, you are in the right place. Just keep reading and trust the process!
First, I’m going to outline the basic SIMPLE science of a sourdough starter and how to make your very own from scratch.
Next, I will take you step-by-simple-step from making a starter to eating your very own delicious homemade sourdough bread.
I gave up on sourdough. I spent years of trial and error trying to get a sourdough starter going until I finally resigned myself to the fact that I couldn't make sourdough. Even though I am a baker. Who spent a year in culinary school. For baking. Clearly it was black magic. Witchcraft. And I am not a witch. I’ll just eat other witches’ sourdough.
But wait! This is, this is a 12 minute read, therefore my story does not end here.
Just three short months ago, I was presented a new lease on sourdough life. Turns out those little sourdough embers were still smoldering.
Here’s the short, uninteresting story...
It starts with a friend of mine receiving a sourdough starter as a Christmas gift. Turns out she had some learning to do herself because the starter, well, it didn’t start (R.I.P Felicia). Then, on Superbowl Sunday, I was at her house and she shoved a mason jar at me with some doughy goo in it and an End User License Agreement sized instruction manual. Turns out, she had gotten a new starter from another friend who had learned of Felicia's untimely departure. A very ACTIVE starter, so I was told. And apparently active = good.
Needless to say, I was skeptical. I was filled with doubt. With dread. I had failed so many times before, could I do it this time? Was I capable? Was I ready? Well, I was ready to try.
In the past when I had tried making my own starters from scratch, I would get close to what I thought was “active”. But I had no frame of reference. I had never actually seen one in person before. So getting a real life active starter and seeing what it was supposed to look like was a life changer (I highly recommend visiting someone with an active starter for reference).
Now, here is where I'm going to rewind just a little. I’m going to share a little of my ignorance so that there will be some more context to this revelation. I began my baking journey long before the internet. Everything I knew came from cook books and home economics classes in school. I learned from watching others on TV and in my home kitchen from my mom and my grandma. Sourdough was a term that was always in the ether, but we weren’t huge bread bakers in my family. We occasionally made bready things and we used commercial active dry yeast for them.
Fast-forward a decade or two. The Internet exists. Youtube, not so much. So I'm just out there winging it. I'm printing off recipes, sometimes there are pictures. I hear the terms associated with sourdough; starter, feeding, bubbly, active, fermentation, yadda, yadda, yadda. At culinary school we covered the basics but I didn't get far enough to actually make any sourdough in class (dropped out to start having babies, yay!). Using the recipes and instructions from school, I was able to get something started at home, but I never quite got it. And, the reality was I had no clue what I was supposed to do with a “starter” once I had it. I didn’t really even understand how to feed the stupid thing. Plus, I was completely lost on how to turn that stuff into bread. It just wouldn’t click. And without proper investigative tools (i.e. the Google), I was just adrift at sea.
Back to the present day. Once presented with this ADHD starter and very specific instructions, I was feeling confident about sourdough for the first time. And then I let it sit there for about a week. I fed it per the instructions and actually kept it alive, but I was still a little lost on HOW to make the freaking bread, despite the detailed instructions and brief tutorial. So I did what I wished I was able to do 20 years ago and ran to Youtube. I logged hours and hours of videos from dozens of bakers making sourdough bread. And then something happened. The door unlocked. It suddenly clicked.
What clicked was that I had been grossly over-complicating things. In my head this was some masterful scientific feat of strength and knowledge. No guys, it’s flour and water.
Let me say that again, a little louder: IT’S FLOUR AND WATER.
I was such a dummy for so long. Yes, there is obviously science to it. But it’s so simple, even I can understand it.
I was so excited that I had unlocked the “mystery”, I actually made my own starter from scratch. AND made bread with it!
Another fun thing about this is you probably already have everything you need to make sourdough in your house right now. Don’t be intimidated by all the sourdough specific tools you see people using in videos or wherever (that’s just a fun new rabbit hole to explore). Those things will probably be helpful to acquire at some point, but they shouldn’t hold you back from getting started.
In an attempt to NOT over-complicate this, I want to state up front that this requires some patience. Not because you’re going to fail and have to restart a hundred times. No no no. It's because of science (you’ll see). I’m only saying this so you give yourself enough time. I don’t want you to think “Oh cool, I’ll have sourdough bread tomorrow after following these super easy basic steps!”. Easy basic steps - yes. Tomorrow? No. Not tomorrow. I would say give yourself at least a week from the time you get your starter started to making your first dough. Maybe even two weeks. It took me a couple loaves to get it just right, so give yourself time (and grace) to get your confidence up!
Now let’s get nerdy.
Sourdough is the OLDEST form of leavened bread. It was invented by the ancient Egyptians and was passed on to the Greeks and Romans and was the primary bread-making method throughout Europe in the middle ages. Sourdough was popularized in America during the 1800’s gold rush days due its reliability in unpredictable environmental conditions (the miners would carry their starters around in pouches around their necks). The invention of commercial yeast in the mid-19th century caused sourdough to fall out of favor due to its much faster production time.
Now we are experiencing a modern revival of sourdough bread due to its amazing digestibility and gut health benefits. And here enters science.
Sourdough is created by a fermented culture of wild yeast and lactic acid bacteria allowing dough to rise and create a “sour” taste.
I did some googling for you:
Leavened: dough that rises.
Wild yeast: a natural, airborne microorganism found on fruits, plants and in the environment.
Fermentation: a chemical change from yeast or bacteria converting sugar/starch into alcohol, acids or gasses (carbon dioxide).
Lactic acid bacteria (LAB): the healthy microorganisms created during fermentation that act as a natural preservative in fermented foods like yogurt, sauerkraut and pickles by lowering the pH.
pH (Potential of Hydrogen): determines the acidity of a water-based liquid. Low pH
(below 7) = acidic. High pH (above 7) = basic. Just for reference, ideal sourdough starter pH is between 3.5 and 4.5.
So how do we create this “culture”? Like this:
Flour: flour naturally contains enzymes that will convert the starches into sugars that are needed to create fermentation (see “fermentation” above).
Water: water activates the enzymes in the flour and creates the ideal environment for microbial growth, like the microorganism known as wild yeast (see “Lactic acid bacteria” above).
It’s really just that simple.
BUT all flour and all water are not created equal.
I’ll keep this short and sweet, no need to over-science this: UNBLEACHED flour, NONCHLORINATED water. If you only have access to city water it likely contains chlorine. You have a couple options to dechlorinate. 1. Use a water filter, like a Brita. 2. Fill a container with a cup or two of tap water and leave it open on the counter for at least 24 hours to allow any chlorine to dissipate (this is what I have read, but I have not yet tested this theory). The short answer here is that you use bleach/chlorine to disinfect, aka kill bacteria, so you don’t want to kill the good bacteria we’re trying to cultivate.
Now that we’ve covered the basics (and the acidics; science humor?), let’s move into the lab - aka the kitchen.
HOW TO MAKE A SOURDOUGH STARTER
Things you will need:
Clean glass jar (a straight-sided jar is best, like a wide mouth mason jar, but any will do)
Loose-fitting lid for jar (or small towel, cheesecloth or rag and a string or rubber band)
Flour (unbleached all purpose or bread flour, whole wheat or rye will all work fine)
Water (bottled, filtered, distilled or purified - no chlorinated tap water)
Kitchen scale with grams (like my 20 year old one here from Walmart)


Once you have all the items collected, follow these steps:
DAY 1
Place your jar on the scale and power on, press ‘tare’ button to set weight to zero
Set unit of measure to grams
Add 50 grams of whatever flour you are using to the jar (I started with All Purpose because that's all I had, but I recommend bread flour)
Press the ‘tare’ button again to set weight to zero
Add 50 grams of water to the flour
Stir together until flour and water are fully combined
Loosely cover jar with lid or a cloth secured with a string or rubber band
Mark the jar where the top of the mixture is sitting with a marker or rubber band
Place jar in a warm place that is protected from temperature fluctuations (ideally 75-85 degrees Fahrenheit)


The natural fermentation process has now begun. The wild yeast on the grains in your flour and floating in the air will find its way to the perfect little mixture you created for it.


DAY 2:
Check your starter for bubblyness and growth. You might see some bubbles and/or some rising.


Once your starter has fully doubled, however long that may take (day 8 for this one), continue the feeding cycle for at least 2 days to ensure a healthy culture has been developed.
(it was still day 6, but 8 hours after the morning feeding it had doubled! so I fed it again to keep it from falling and getting too hungry)


(doubled again, nice and bubbly)


I'm going to continue feeding for 2 more days to make sure it's really stable.
This is what I've been waiting for! It's almost like marshmallow cream...


And NOW we're ready!


Doubled and domed 4 hours after feeding = ready to use!


The starter you just created from almost nothing is now ready to be used as a leavener for a delicious and nutritious loaf of sourdough bread.
Just think of the starter as a substitute for a commercially produced active dry yeast packet.
Those packet days are far behind us now.
Awesome! Now what?
Let's make some bread!!
HOW TO MAKE SOURDOUGH BREAD
Things you will need:
Sourdough starter (for best results, feed your starter about 4 hours prior to using)
Flour
Water
Mixing bowl
Plastic wrap or towel
Dough scraper
Banneton or a basket or bowl
Parchment paper
Dutch oven with a lid
Sharp knife or bread lame
All you have to do is follow this simple recipe and step by step instructions for a perfect little loaf of crusty, springy sourdough bread.
INGREDIENTS
500g unbleached all purpose flour
350g filtered water
100g sourdough starter
10g salt
INSTRUCTIONS
In a medium-size mixing bowl, add the flour and the water. Mix together with a wooden spoon or dough whisk (or just get in there with your hands) until all the flour is wet. The sciency word for this is AUTOLYSE.
Continue mixing with your hands until a wet dough forms. Scrape down the sides of the bowl and shape into a ball. The dough will be wet and sticky. Cover with a towel or plastic wrap and let rest for at least 30 minutes, or up to two hours.


Add sourdough starter and salt to the flour/water dough. Vigorously mix with hands to thoroughly incorporate starter and salt. Continue until the dough becomes somewhat smooth and elastic, 5-7 minutes. It will still be a bit sticky. The sciency word for this is FERMENTOLYSE.
Cover bowl with towel or plastic wrap and let rest for 30 minutes.


BULK FERMENTATION
Perform a series of “stretch and folds”.
Set 1: Wet your hands. Scoop up one edge of the dough and pull up to stretch, without tearing the dough, then fold over. Turn the bowl ¼ turn and repeat the stretch/fold process until you have completed four turns.
Cover bowl and let rest for 30 minutes.
Set 2: Wet your hands. Scoop up one edge of the dough and pull up to stretch without tearing the dough then fold over. Turn the bowl ¼ turn and repeat the stretch/fold process until you have completed four turns.
Cover bowl and let rest for 30 minutes.
Set 3: Wet your hands. Scoop up one edge of the dough and pull up to stretch without tearing the dough then fold over. Turn the bowl ¼ turn and repeat the stretch/fold process until you have completed four turns.
Cover bowl and let rest for 30 minutes.
Set 4: Wet your hands. Scoop up one edge of the dough and pull up to stretch without tearing the dough then fold over. Turn the bowl ¼ turn and repeat the stretch/fold process until you have completed four turns.


LONG FERMENTATION
After completing the 4th “stretch and fold”, cover the bowl and let the dough ferment for 4 hours in a warm area (ideally 75-85 degrees Fahrenheit) free of drafts and extreme temperature fluctuations.
PRE SHAPING
After 4 hours of fermentation, scrape dough out of the bowl and onto your work surface.


Using a dough scraper, gather dough into a ball by pushing the scraper under the edges of the ball and pulling the dough in a circular motion with the other hand.


Once a smooth ball has formed, leave the dough on the work surface, uncovered for 15-20 minutes, until a thin, dry skin has formed on the surface.


FINAL SHAPING
Prepare a banneton or basket or bowl by lining with a cotton towel and dusting with a layer of flour.


Flip your ball of dough over onto the work surface so the smooth, dry side is now facing down. Gently push the edges out to slightly flatten.


Wet your hands here for best results.


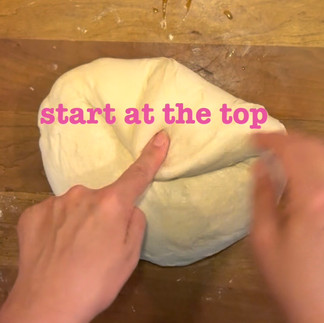
Place one finger in the center of the dough ball and pull a section of dough from the outer edge into the middle and hold down with your finger placed in the center. Repeat the process until you have pulled in the entire outer edge of the dough.


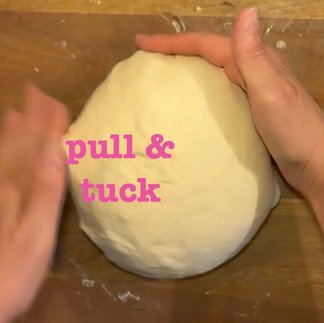
You should now have a ball roughly half the size of the original.
Flip the dough ball back over so the smooth side is facing up again.


Tighten up the ball by pushing it around the work surface in a small circular motion while using your pinky fingers to tuck under the edges.


Once the ball is nice and tight, flip it over into your prepared banneton/basket/bowl so that the smooth side is facing down.


Now tighten up one last time by pinching up the center of the dough and eliminating any seams.


COLD FERMENTATION
Cover your banneton/basket/bowl with a towel or plastic wrap and place in the refrigerator.


Leave in the refrigerator for 8-18 hours (note: more time in fridge = more sour flavor).
PREPARE THE DOUGH FOR BAKING
Place a Dutch oven, with the lid in place, in your oven.


Set oven temperature to 450 degrees Fahrenheit.


Let the oven preheat for about an hour.
Prepare a piece of parchment paper to set the dough on for baking.


Once the oven has fully preheated, remove the dough from the refrigerator and immediately turn the banneton/basket/bowl over onto the parchment paper (you don't want the dough sitting out at all and warming up).
Pull the banneton/basket/bowl and liner off the dough.


Cut an expansion line into the dough by scoring with a sharp blade or bread lame (pronounced lahm) from one side of the dough to the other in a firm, deep cutting motion, about half an inch deep.


BAKE THE BREAD
Remove the lid from the dutch oven and drop in the dough with the parchment paper.


Put the lid back on and bake for 20 minutes.


After 20 minutes, remove the lid from the Dutch oven and bake, uncovered, an additional 20 minutes.


After the full 40 minutes of baking is complete, remove the bread from the dutch oven and place onto a cooling rack.


Allow bread to cool for at least one hour before slicing. Letting the bread cool completely is ideal to prevent the inside from becoming “gummy”.


Store your bread in a beeswax lined bag, or a loosely closed plastic bag, and eat within a couple days for maximum freshness.
That’s it guys. You made sourdough bread. WE made sourdough bread.
Now, this is pretty much the most basic foundational recipe and process. Don’t get overwhelmed by all the techniques for folding and shaping and all the millions of minutia on the interwebs out there.
If you are new to this, like me, then you are probably still trying to learn the basics, like me.
This process is absolutely perfect for me right now. I do not need to expand on anything just yet because, guess what… this gets me sourdough bread. Delicious sourdough bread that my family and I love to eat.
If this is where your sourdough journey ends, you are in good company. It doesn’t have to be fancy guys.
IT’S FLOUR AND WATER.
xoxo lw
My very first loaf, very first starter and first loaf from the first starter!


Download recipes here!

Comments